Pages

Monday, January 17, 2011

Golden Lentil Balls with a Cheesy Interior


Wanted to make lentil fritters in a different way than the usual! Sneaked in a pinch of mozzarella cheeze in the center. Crunchy golden balls could be made ahead and deep fried just before serving.

Grind together:
a cup of soaked lentils - I used channa dal, and kept spoonfuls of dal aside before grinding
1" piece of peeled and chopped ginger
2-3 garlic cloves
2-3 cloves
1/2" cinnamon
3-4 green chili

and mix with:
1 small onion chopped
a handful of coriander leaves chopped
a tsp of chopped curry leaves
salt - to taste
rice flour - just enough to absorb the extra moisture and give the balls a crunchy exterior


Stuff in small bits of mozzarella cheese as shown below:


Deep fry to indulge in these golden beauties.


Best Blogger Tips

Friday, January 14, 2011

Chocolate Mud Cake


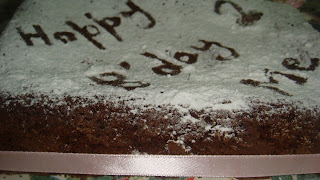
I was born on an auspicious day, Makara Sankranti! This year Sankranti has deviated from its ususal 14th to 15th... No holiday on my Birthday! Yesterday night post dinner after kids had gone to bed, got Abbas into helping me prepare a cake. Well, I hesitantly asked Abbas and to my surprise (read SHOCK!), he said I myself was planning to bake a cake for you... I had already decided it was going to be Divya's Chocolate Mud Cake the day I laid my eyes on the pics! I was chopping chocolate and they were disappearing into my helper's mouth! I wanted to shoo him away. While I was busy melting chocolate, preparing sugar solution... his highness was chatting with his Bro and was pitching in once in a while to check if I needed help! I asked him to measure a cup of flour and mix with cocoa powder and baking soda. He inverted my flour container to pour it into a cup and almost another cup of flour spilled into the mixing bowl. I put all the flour back into the container and meausred myself, threw in other ingredients and he performed the most difficult act of mixing them together! And before I knew it, he had disappeared from the kitchen. I let the cake bake in the oven and went to bed. Early morning, I woke up and decorated the cake by cutting out stencils and dusting with icing sugar. All thanks to Suma coz I got this brilliant idea from her blog!

Here goes the recipe to dive into Chocolate Niravana as Divya rightly said:

Recipe source - Lakshmi Nair
Ingredients

Flour – 1 cup
Baking soda – ½ tsp
Cocoa Powder – ¼ cup
Sugar – ¾ cup
Boiling water – ¼ cup
Instant Coffee Powder – 1 tsp
Dark Chocolate – 125 gms,grated or chopped (I used Milk chocolate of Selbourne brand)
Butter – 125 gms,unsalted
Eggs – 2

Method

1. In a mixing bowl, mix together sugar, boiling water and coffee powder till the sugar dissolves. [If you are using granular sugar, it wouldn’t dissolve completely and that is fine]
2. In another pan melt the butter and add the chocolate,make sure the pan is on low heat. In about 2-3 minutes, it will melt completely and become a chocolaty mass. Switch off the flame.
3. Add this to the sugar mix and mix everything together with a wooden spoon. Let it cool and come to room temperature.
4. Meanwhile, prepare the baking tin-grease and line an 8’ round cake tin.
5. Preheat oven to 175C.
6. Sift together flour, baking soda and cocoa powder.
7. When the chocolate mix is cool, beat in the flour mix little at a time-you could use a wooden spoon or a hand mixer.
8. After all the flour has been mixed in, add the eggs one at a time and beat well.
9. Transfer to the prepared baking tin and bake for 30-35 minutes[it took exactly 35 minutes in my oven].
10. Cool the cake in the tin and then invert to a cooling rack.
11. Using a sieve, dust powdered sugar on top and slice into wedges.
Serve with a dollop of Chocolate ice-cream and transport yourself into Chocolate Nirvana!!



And that's the way I cut out my stencil:

Best Blogger Tips

Wednesday, January 12, 2011

Caramel Custard


One of my favourite desserts... I always tasted these in restaurants and craved to recreate at home. Ma prepares a pudding which is in the same lines of this dish. I didn't know how to get the caramel layer on top. Googling yielded me several recipes and I finally picked this coz the custard recipe was quite similar to Ma's pudding recipe except that Ma adds a few torn bread slices to it. Due to lack of proper vessel for steaming, when the custard was inverted, it had a free fall and totally changed shape. The pictures hence might not be so appealing but it tasted excellent nevertheless. I'm hunting for ramekins to prepare this next time.

This reminds me of Srujanie, one of my friends and ex-colleagues in Kolkata. She would cook and bring all those dishes that I loved, to office and pampered me. She is a great cook, I really miss her... She had once brought this custard and I alone gobbled it all!

Ingredients:

For the custard:
2 cups milk
2 eggs
2 tablespoons sugar
1/4 teaspoon vanilla essence

For the caramel
3 tablespoons sugar (I suggest to use 11/2 or 2)
1/2 cup water
a deep mould for steaming

Method for the caramel
1. Melt the sugar on low heat until it turns a deep brown. Remove from fire, add the water carefully, then put back on fire and cook on slow heat until a thick honey-like syrup is obtained. This is the caramel.
2. While still hot, pour the caramel into the mould (rinsed in cold water) and gradually turn the mould so that the sides get coated with the caramel. Leave aside.

For the custard:
1. Beat the eggs with the sugar thoroughly.
2. Boil the milk. While still boiling, pour into the egg-sugar mixture and beat vigorously until well blended. There should be no lumps.
3. Add the essence, beat once again and pour into the mould.
4. Cover the mould with a piece of aluminium foil. Bring down the foil on all sides and tie at the rim of the mould with the piece of string.
5. Steam cook the custard on very low heat for 30-45 minutes. (A fine needle pierced through should come out clean). Remove the foil. Cool, and refrigerate until ready to serve.
6. Just before serving, cover the mouth of the mould with a plate. Quickly turn the mould over on to the plate and remove the mould. Serve immediately.

Best Blogger Tips

Friday, January 7, 2011

Meringue Cake


Recipe source:http://www.joyofbaking.com/MeringueCake.html


Cake Batter:


4 largeeggyolks
1 cup (100 grams) sifted cakeflour
1 teaspoon baking powder
1/8 teaspoon salt
1/2 cup (1 stick) (114 grams)  unsaltedbutter
1/2 cup (100 grams) granulated whitesugar
1 teaspoon purevanillaextract
1/4 cup (60 ml) milk

Meringue Layer:
4 largeeggwhites
1/4 teaspoon cream of tartar
1/3 cup (65 grams) granulated whitesugar
1/2 teaspoon purevanillaextract

Topping:
1 cup (240 ml) heavy whippingcream
1- 2 tablespoons (14 - 28 grams) granulated whitesugar
1 pound (454 grams) fresh strawberries, cut into bite sized pieces
Confectioners Sugar (powdered or icing) fordustingtop of cake

Method:
Cake:Preheat oven to 350 degrees F (177 degrees C) and place rack in center of oven. Grease and flour two - 8 x 1 1/2  inches (20 x 3.75 cm) round cake pans. Set aside.
Separate the eggs while they are still cold, placing the yolks in one bowl and the whites in another bowl. Cover the two bowls with plastic wrap and allow the eggs to come to room temperature before using (about 30 minutes).

In a mixing bowlsiftor whisk together the flour, baking powder, and salt. Set aside.
In bowl of your electric mixer, or with a hand mixer, beat the butter until soft (about 2 minutes). Add the sugar and beat until light and fluffy (about 2-3 minutes). Add the egg yolks, one at a time, beating well after each addition. Scrape down the sides of the bowl and then beat in the vanilla extract.

With the mixer on low speed, alternately add the flour mixture and milk, in three additions, beginning and ending with the flour. Divide the batter evenly between the two cake pans, smoothing the tops with an offset spatula. Set aside while you make the meringue layer. 
Meringue:In a clean bowl of your electric mixer, or with a hand mixer, beat the egg whites until foamy. Add the cream of tartar and continue beating until soft peaks form. Gradually beat in the sugar and continue to whip until stiff peaks form. Beat in the vanilla extract. 
Divide the meringue between the two cake pans, gently smoothing the tops with an offset spatula.Bake for approximately 25 - 30 minutes, or until a toothpick inserted in the center of the cake comes out clean. The meringue layers will have turned a light brown and will be crisp to the touch but soft inside.Place the pans on a wire rack to cool. When completely cooled, remove from pans. 

Shortly before serving whip the cream with the sugar until soft peaks form. Cut the strawberries into bite sized pieces and, if necessary, add a little sugar to sweeten them. Place one of the cake layers, meringue side up, on a serving platter. Spread the whipping cream onto the cake and top with the strawberries. Gently place the second cake layer, cake side down so the meringue layer is facing up, onto the first layer. Dust with confectioners (powdered or icing) sugar. If not eating immediately, cover and place in the refrigerator until serving time. The assembled cake will hold in the refrigerator for a few hours. 
Best Blogger Tips

Wednesday, January 5, 2011

Ucche, Shozne Data, Bori ar Alur Tarkari - Bitter Gourd, Drumstick, Lentil Dumpling and Potato Stir Fry


One of my favourite side dishes on a Bong platter. The combo of Bitter Gourd and Drumstick is very rare, and takes the dish to an entirely different level. I fail to express the taste of this side dish, one has to taste it to feel it. The presence minimal spices lets one taste all the veggies in their natural form unadulterated.

I learnt it from Ma who learnt it from someone else. She must've told me that someone's name atleast 24 times. But I forgot. Anyhow, whoever it is, god bless her! My ears have a special filter which only let in what is necessary out of Ma's non-stop iterative speech! Anyway, all credit goes to her for me learning Benagli so quickly. I picked it up by imitating her tape recorded excerpts which get repeated with each word in the same order each time. Jokes apart, I can't stand Ma's silence. Ma, you keep talking (while my ear filter is intact, lol)

Ingredients:
Bitter Gourd – 1 medium, sliced
Drumstick – 2 to 3, cut into finger sized pieces
Potato – 2 medium sized, cut in french fry style
Bori – ½ cup (optional)
Panch phoran – 1 tsp or Nigella seeds – 1 tsp
Turmeric powder – 2 tsp
Cumin powder – 1 tsp
Red chilli powder – 1 tsp
Salt – to taste
Oil – 2 tbsp

Method:
  1. Shallow fry bitter gourd, drumstick, potato and bori by marinating them with salt and turmeric powder in a tbsp of oil. (Make sure you fry the boris at the end coz they absorb all the oil)


  1. Heat remaining oil in a pan. Add panch phoran or nigella seeds.
  2. When they splutter add all the shallow fried ingredients, turmeric powder, cumin powder, red chilli powder, salt and combine.
  3. Add 1 cup of water and cook on low flame covered till all veggies are cooked.

Note:
There is no need to cook till all water is evaporated. You could leave some amount of water coz if it is left to stand, Boris and Potatoes might absorb any remaining water.


This goes out to Jagruti's Complete my Thali event


Best Blogger Tips

Tuesday, January 4, 2011

When Carrot Halwa played hide 'n seek with Wantons


Whenever we eat out at Chinese restaurants, all I look forward to is to order deserts. I have a soft spot for Chinese sweet somethings. Darsan is my all-time favourite! Only cuisine Abbas is fond of other than Indian is Chinese. I recently ordered a book online on 'Chinese Cooking' by Sanjeev Kapoor. There are recipes of soups, starters, main course and desserts. One of the items in dessert section read Mango Wantons. It called for dried mango pulp filled in wantons. Since I had made Carrot Halwa a day before, I screamed 'Eureka!'. The sudden urge to twist the tale of Wantons hit me and I made this after 10 PM in the night on Abbas's birthday (Although I had made cake and Payesh that day). Sanjeev Kapoor had ice-creams as serving suggestion. But since I had Payesh / Payasam, served with that. My Wanton wrappers for the first trial had turned out a bit thick leaving some parts of the interior uncooked. Make sure you roll the dough as thin as 1mm in thickness. Will post my Carrot Halwa recipe when I prepare it next. Coz I couln't click this time around.

Ingredients:

For filling:
Carrot Halwa - 1/2 cup

For Wanton Wrappers:
Maida - 1/2 cup
Warm water - 1/4 cup
Oil for deep frying

Method:
1. Knead maida with warm water to make a firm dough.
2. Roll the dough into a large thin square sheet, about one millimetre think. Cut the sheet into three-inch squares.
3. Place the carrot halwa in the centre of each square. Fold into a triangle. Twist the two edges of the folded sides and bring them together, moistening the ends with water to seal.
4. Heat the oil in a wok and deep fry the wantons till golden. Drain on absorbent paper.
5. Serve hot with vanilla ice-cream.


This goes out to Priya's Bookmarked Recipes - Every Tuesday Event


Best Blogger Tips

Monday, January 3, 2011

Choco Chip Cookies


Have been baking cakes and muffins for quite some time. Yes, the baking bug has bitten me hard. And I wanna venture into new arenas of baking. All thanks to Sweet Punch team and fellow bloggers, I'm learning and growing as a baker. Several times while I blog-hop, go through mind blowing recipes and check the ingredient list first. I frown at the sight of ingredients that I don't have access to or won't be able to procure. Specially ingredients related to baking are like treasures to be hunted for in India. Some time ago, I bumped into Suma's blog where she has written a post on availability of baking raw materials in Bangalore along with address and contact details. That page delighted me more than my pay-slip or even offer letetrs for that matter!

Recently visited this small shop called General Additives in Seshadripuram, which had most of the items in my wish list. The best part is that the prices are genuine. I bought whipping cream powder, choco chips, dark chocolate, milk chocolate, cake tin, muffin cups... For the next two days, I would open the packet of these goodies, and wonder what to make with my long-awaited belongings. I zeroed in on something that I had never made before. Ria's choco chip cookies were the best bet!

I'm glad I chose her recipe coz they are 100% trust worthy and one can follow the recipe blindly to the T without any apprehensions about results. Thanks Ria, for being an inspiration to budding bakers like me...


Best Blogger Tips
Related Posts Plugin for WordPress, Blogger...